


GameDev 48: Transform UI
Translation, Scale, Rotation
24.04.2020 - 22:55For the longest time the only way to transform a model in my editor was via a window with sliders for the rotation and scale and buttons that nudged the position slightly. At some point I also added keyboard shortcuts so it was possible to nudge the values with the keyboard. However, neither of these methods was convenient or intuative to use. Therefore I finally decided it was time to implement a proper transform UI so models can be transformed via dragging and dropping like you would expect in Blender or other modelling programs/game engines.
Translation
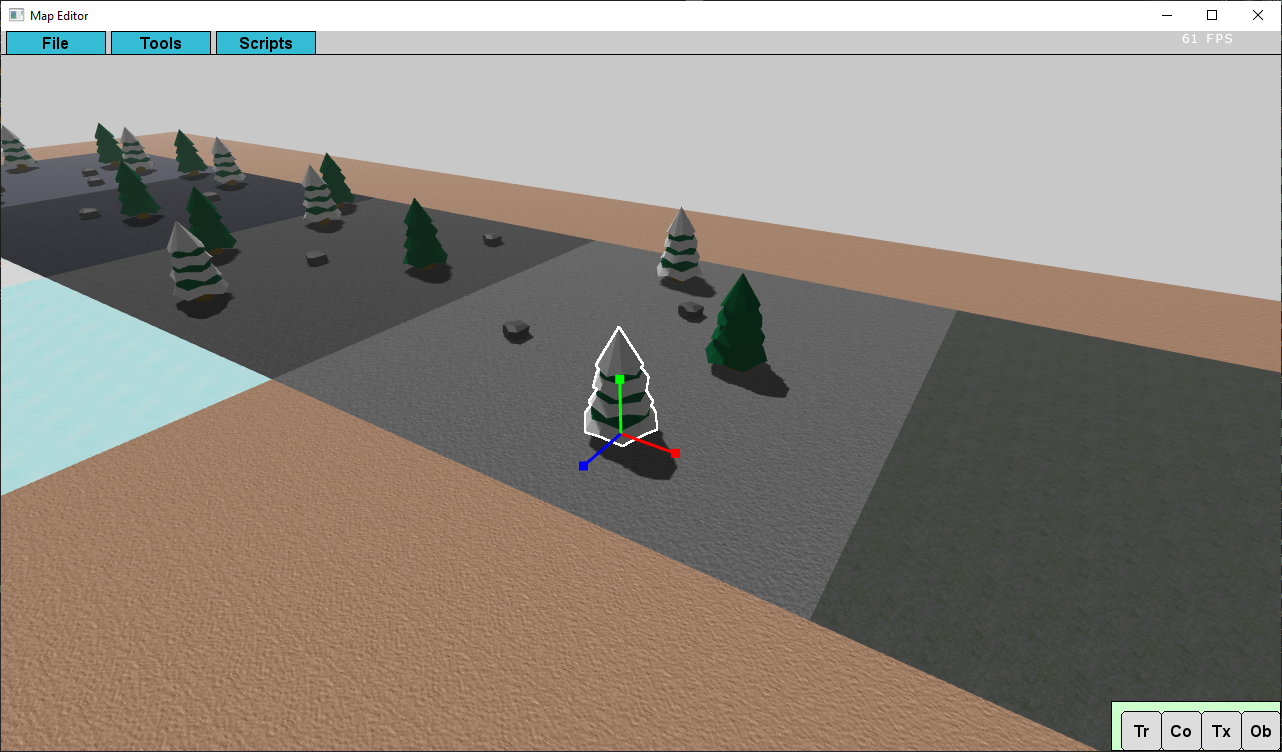
The first transformation I worked on was translation, because I figured it's the easiest of the three. I started with three lines in the directions of the coordinate axes and big points at the end of the lines. The points are what the user interacts with to translate the model. When the mouse is pressed, I calculate the screen space position of these points and check whether the click was on/near them. If it was, the model can be transformed on that axis by moving the mouse, until the mouse is released, which confirms the transformation. At first I just used the delta mouse movement and converted it directly to the distance that the model should be moved by. But that felt quite bad, because the delta mouse movement doesn't take the projection into account and therefore the mouse movement didn't line up with the model movement. Instead I do a mouse pointer ray cast and calculate its intersection with the plane of transformation, e.g. when translating in the x direction the position of the click on the ground (x/z plane). Every frame while the mouse is pressed, I also calculate the position of the mouse pointer on the ground and instead of taking the delta mouse position directly I take the delta position between the points on the ground. With this method the projection is taken into account and the mouse movement corresponds a lot better to the model movement.
Scale
Once I had translation working, implementing scaling followed quite easily. It uses the same method as translation with only a few minor changes. My editor currently only supports uniform scaling, because non uniform scaling changes the normal vectors of a model and I don't really feel the need to scale a lot of models non uniformly. But in case I want to support non uniform scaling at some point I already implemented it in the transform UI and added a flag to turn it on.
Rotation
The last transformation method I worked on was rotation. This was the one I was most worried about, because I wasn't sure about how to implement it best. The first idea I had was to use very simple "circles" as the user interface, which only had 4 lines, so they looked more like a quad. With these simple circles I could use the same method as for the translation to calculate whether the user has clicked on a circle: calculate the position of the points in screen space, take a line between them, calculate the distance of the click to the line and if it was close enough it was a hit. To figure out by how much the model should be rotated I also used the same trick from the tranlation: to find the position on the plane and calculate the angle from the model center.
First Rotation Version:
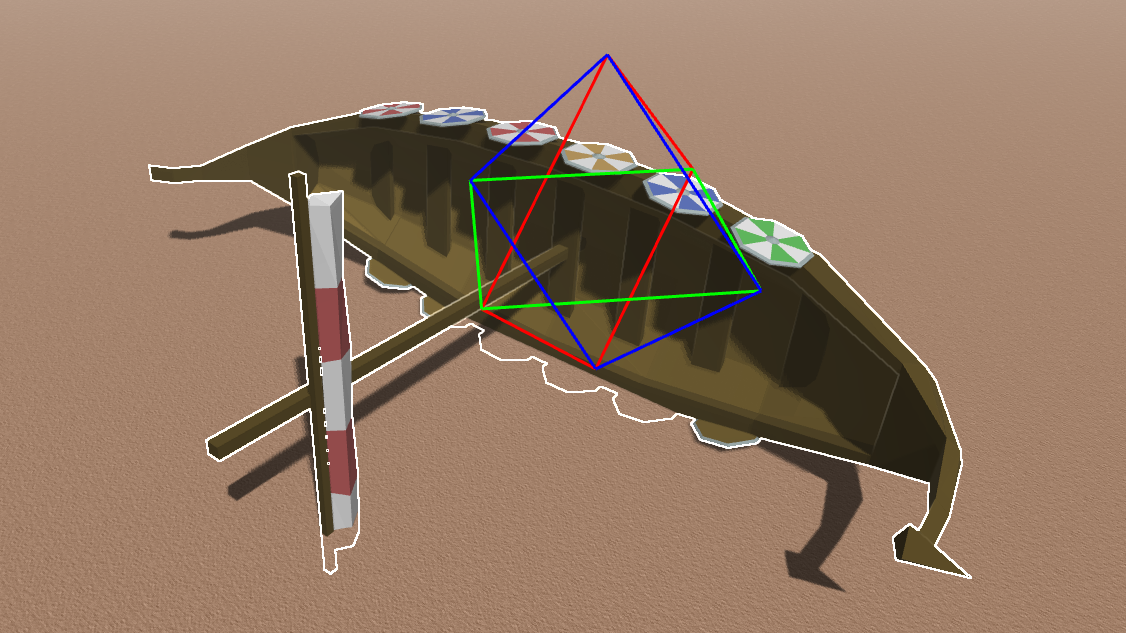
This version worked mostly fine, but I had two major flaws, which were bothering me. Firstly the circles with only 4 lines looked really bad and secondly there was an annoying bug, that the rotation jumped by +-180 degrees at certain positions, which made it very difficult to get the model rotated in the correct way. Therefore I decided to scrap the first rotation version and work on an improved one. I tried to use an old Circle3D class to get round circles, but it didn't work properly, the circles were oriented in a weird way, I assume the rotation matrix I was using may have been in a different coordinate system, but I didn't investigate it any further. Instead I created a new AxisAlignedCircle3D class, because the math is easier when axis aligned ;). And with it I was able to get nice round looking circles. Then I though a bit more about the click detection method I was using for the circles and found a better and easier way to do it. I calculate the intersection between the mouse ray and the plane of rotation anyway. So all I needed to do to check whether the circle is hit was to calculate the distance of the intersection point from the center of the model, and if the distance is close to the radius of the circle, the circle it hit. While I was at it, I decided to calculate this every frame while the transform UI is visible and add a hover effect to the circles if the mouse is over them. Then I had a closer look at the angle jumping bug and after a while found the problem. It had to do with the tangent when the sign of the denominator changed. Luckily I had already found a solution for this when I was working on rotating my projectiles to always point into the direction they are flying. With all of these changes the rotation UI is now my favorite one.
Second Rotation Version:

General
Even though right now the transform UI is only used in my editor, I wanted to add the code directly to my engine, so I can use it more easily in other projects, for example if I want to create a game at some point that allows the free placements of assets like Planet Coaster/Zoo. This made a few things a little bit more complicated, because I had to think about a more general solution. In the end I used callback functions when a transformation is started, while it is in progress and when it is finished.
I also made the transformation UI change its size depending on the distance from the camera, so it is still usable even when zoomed out far.
Finally, I used a really nice trick to update the model on the fly while it is being transformed that made me feel like a genius when I though of it. Static models are instanced, but the editor also has a preview model that is rendered while a model is being placed. When a model is transformed, it's more like placing it, so it makes sense to use the preview model for that. However, having the instanced model still there felt really weird and I had never implemented a hide function for a single model instance. And I couldn't think of an easy way to add a hide function, but then I thought: "Hey, I have a setScale() function, I'm just going to use setScale(0) and I'm done".
Offtopic: My Own ChronoLapse
A while ago I wanted to film myself programming and turn it into a timelapse. I had heard of ChronoLapse and tried to use it to take a screenshot every 5 seconds, and while the screenshot taking itself worked, I couldn't turn it into a movie clip easily. ChronoLapse has an inbuilt function for that, but the result was increadibly blurry and text on the screen was hardly readable. And I couldn't use my normal video editing program either, which has a function to automatically create a timelapse from individual image, because the ChronoLapse filenames didn't work with that.
Instead of looking for another alternative I figured it's probably easier to just create my own program for this. I googled a short code snipped on how to take a screenshot with the WinAPI, converted the WinAPI bitmap format to my own image format and added a bit of code around it to take a screenshot every 5 seconds and create proper folders and filenames and stuff. And the program works fine, I used it to create a complete timelapse of my Ludum Dare 46 game last weekend, check out the timelapse and blogpost I made about it: Ludum Dare 46 Blogpost
by Christian - 24.04.2020 - 22:55